Week Two: Camera settings
- Jane Byrne

- Feb 24, 2021
- 2 min read
In class this week we looked at the three pillars of photography and the technicalities and differences of a SLR and mirrorless camera. The three pillars of photography are aperture, shutter speed and ISO. We studied these individually to see what effect they have on the production of a photo and the relationship between them when shooting images.
This is a part of photography that I was somewhat familiar with from my module in first year but had forgotten as the college years have gone by therefore I welcomed the lesson.
In short, the aperture controls how much light comes through the camera lense and falls on the light sensor. A higher aperture e.g f/16 means less light is entering through the camera. A lower aperture means more light is entering the camera, which is better for low-light scenarios. Below are visual examples of the importance of aperture when taking images.


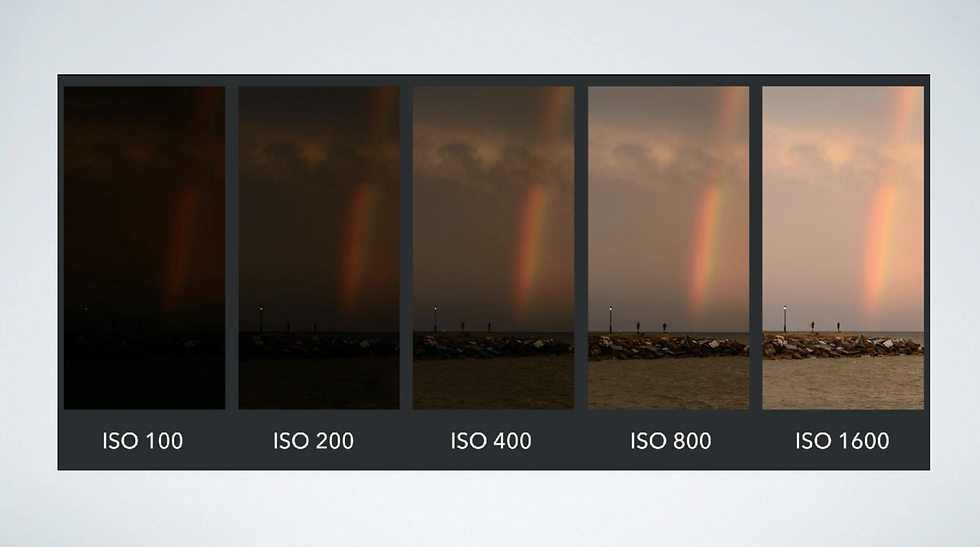
The next pillar of photography we discussed was the ISO. In short, the ISO is a setting that will brighten or darken your image. The higher you increase your ISO number, the brighter your images will appear. The ISO can be helpful if you want to capture a photo in a dark setting. The ISO should also be used with your aperture and shutter speed to produce stellar images. Smartphones are so high tech these days that the newer models of the IPhone actually have ISO built into them and that's what I have been playing around with when taking my pictures.
The image below illustrates the effect of a high or low ISO on an image.

The last pillar we looked at was the shutter speed. The shutter speed refers to the amount of time that the camera's shutter is open. The longer the shutter is open, the more light that passes through to the camera's sensor. Conversely, the shorter the shutter is open, the less light that's able to pass through. Before I knew how to take a basic image but now I feel like I know a lot more about the technicalities of the camera and I can already feel my photography improving by incorporating these settings.

We then went on to look at how a camera works which was really fascinating. I found the mechanics of the mirrorless camera really interesting.
Below are diagrams taken from the lecture showing the intricate details behind the working of a camera.

Next we moved on to how to edit and use Adobe Lightroom. I had never used this software before however Conor's tutorial was very interactive and we could edit our photos as we were going along which I found very helpful. I was surprised at how much you could edit a photo in this app. Not only it is for editing the quality of your image but it is also for cleaning up sharpness, focusing on a particular subject and edit out different portions of the image.
Lastly, we were given the task of editing 5 photos of our choice on lightroom and uploading them to our blog. We were also given our first assignment - a five shot story of something in your area.
Come back next week to see what more photography tips and tricks I've learnt!


Comments